
LaTeX Unlocked: A Powerful Blueprint for Beginners to Conquer Document Design! (Part 1)

Table of Contents
ToggleIntroduction
Welcome to the world of LaTeX, a sophisticated typesetting system that turns your writings into polished, professional works of art. LaTeX provides a versatile and fast way to write documents with precision and flair, whether you’re a student, scholar, or educator. In this comprehensive introduction, we will go over the fundamentals of LaTeX, breaking down each component to create a seamless learning experience for novices.
1. Understanding LaTeX
LaTeX, pronounced “LAY-tech” or “LAH-tech,” is a document preparation system that is commonly used to create publications such as research papers, articles, reports, and even presentations. LaTeX, unlike standard word processors, employs a markup language approach, allowing users to concentrate on content production while the system handles formatting.
2. Why LaTeX?
a. Quality Typography
LaTeX is very good at delivering high-quality typographic output. It automates document formatting to ensure consistency in typefaces, spacing, and overall layout.
b. Mathematical Typesetting
One of LaTeX’s most notable characteristics is its outstanding support for mathematical typesetting. LaTeX provides a stable environment for expressing mathematical material, whether you’re creating simple equations or sophisticated mathematical proofs.
c. Cross-Referencing and Citations
LaTeX simplifies the process of creating cross-references within your document and managing citations. It is particularly useful for academic writing where accurate referencing is crucial.
3. Target Audience
This guide is intended for those who are new to LaTeX and want to understand its essential ideas. Educators, students, and anyone else interested in creating professional-looking documents will find useful insights and practical recommendations along the way.
As we explore the world of LaTeX, keep in mind that the learning curve may appear steep at first, but the benefits in terms of document quality and efficiency are well worth the investment. Let’s go on this exciting journey together, unraveling the complexities of LaTeX and equipping you to create documents with finesse.
Getting Started with LaTeX
Now that you have a basic understanding of what LaTeX is and why it is such a useful tool, let’s get into the nuts and bolts of getting started with LaTeX. This section will walk you through installing LaTeX, configuring a LaTeX editor, and creating your first basic document.
1. Installing LaTeX
You must first install a LaTeX distribution on your computer before you can begin working with it. There are numerous distributions available, but two of the most popular are TeX Live and MiKTeX. Here’s a quick rundown:
a. TeX Live
- TeX Live is a comprehensive distribution available for various operating systems, including Windows, macOS, and Linux.
- Visit the TeX Live website and follow the installation instructions for your operating system.
b. MiKTeX
- MiKTeX is another cross-platform LaTeX distribution with a focus on Windows users.
- Download MiKTeX from the MiKTeX website and follow the installation instructions.
2. Setting up a LaTeX Editor
While a simple text editor can be used to create LaTeX documents, using a dedicated LaTeX editor improves the experience with features such as syntax highlighting and built-in compilation. Consider the following two popular LaTeX editors:
a. TeXworks
- A user-friendly and cross-platform LaTeX editor.
- Included in the TeX Live distribution.
- Provides a straightforward interface for editing and compiling LaTeX documents.
b. Overleaf
- An online LaTeX editor that requires no installation.
- Ideal for collaborative work as it allows multiple users to edit the same document simultaneously.
- Create an account on Overleaf and explore its user-friendly interface.
3. Basics of LaTeX Input File
Now that you have LaTeX installed and a preferred editor set up, let’s create your first LaTeX document. A basic LaTeX document consists of three main parts:
- The
\documentclass{article}line specifies the document class (in this case, an article). - The
documentenvironment contains the main content of your document. - Text and commands go between
\begin{document}and\end{document}.
The output of the above code is shown below:
Congratulations! You’ve successfully set up LaTeX and created your first document
Document Formatting
In this section, we will go over the essentials of the LaTeX preamble, including document class options, packages, and sectioning and displayed content structuring.
A. Preamble & Document Class Options
The preamble is the first section and serves as the foundation of your LaTeX document. It’s where you define the overall look and feel of your document by configuring various settings and loading packages. The following is a summary of what you’ll find in the preamble:
1. Document Class
The first line of your preamble begins with the \documentclass{} command, followed by the name of the document class. This specifies the general type of document you’re creating (for example, article, book, or report). The most commonly used document classes include:
- article: Suitable for short documents, articles, and reports.
- report: Ideal for longer documents with chapters, such as a thesis or a multi-chapter report.
- book: Designed for book-length documents, providing features like chapters and parts.
- letter: Tailored for writing letters.
You can further customize your document by passing optional arguments to the documentclass command, such as font size and paper size.
2. Document Class Options:
Document classes frequently provide a variety of options for tailoring their behavior to specific needs. These options are enclosed in square brackets after the document class name. For example, the article class includes options like
11pt: Sets the font size to 11pt.a4paper: Specifies the paper size as A4.twoside: Enables double-sided printing.openright: Starts each chapter on a right-hand page.titlepage: Adds a title page automatically.
You can combine multiple options by separating them with commas as shown below.
3. Packages:
- LaTeX packages provide additional functionality beyond the core capabilities of the document class.
- Packages are loaded using the
\usepackagecommand followed by the package name. - Some commonly used packages include:
amsmath: For advanced mathematical typesetting.graphicx: Enables including graphics in your document.hyperref: Creates clickable hyperlinks within your document.
- Many packages offer their own options to customize their behavior, similar to document class options.
4. Additional Settings:
The preamble can also include various settings like:
\title: Sets the title of your document.\author: Specifies the author(s) and their affiliations.\date: Inserts the current date automatically.\maketitle: Prints the title, author, and date on a separate page.
5. Example Preamble:
Click to see the code ouput
Understanding and selecting the appropriate document class is a critical step in creating a well-formatted LaTeX document. As we progress through this guide, we’ll look at more formatting options, such as sectioning, displaying material, and fine-tuning your document’s appearance. Let’s continue our exploration of the fascinating world of LaTeX document formatting!
B. Sectioning
The hierarchy and structure of your document are determined by sectioning commands. They define the various heading levels, such as chapters, sections, and subsections. Let’s look at the main sectioning commands and how they’re used.
1. Creating Sections
To create sections in your document, use the following commands:
Consider the following example:
Click to see the code ouput
2. Formatting Section Headings
LaTeX automatically formats section headings, but you can customize their appearance using various commands:
The asterisk (*) suppresses the numbering of the section or subsection.
Consider the following example:
Click to see the code ouput
3. Cross-Referencing Sections
LaTeX allows you to cross-reference sections within your document:
The \label command assigns a label to the section, and \ref is used to refer to that label elsewhere in the document.
Consider the following example:
Click to see the code ouput
4. Adding Section Summaries
You can add a summary or description to a section using the \paragraph and \subparagraph commands:
Consider the following example:
Click to see the code ouput
5. Table of Contents
LaTeX automatically generates a table of contents based on your sectioning commands. To include it in your document, add:
Consider the following example:
Click to see the code ouput
6. Numbering and Depth
To control the numbering and depth of sections, use the following commands in the preamble:
Adjust the values to control the level of sectioning you want to include in your document.
Let’s explore two examples to illustrate the impact of changing numbering and depth in LaTeX:
Example 1: Default Numbering and Depth
Click to see the code ouput
In this example, the default numbering and depth are maintained. All sections (up to subsubsection) are numbered, and they are included in the table of contents
Example 2: Adjusted Numbering and Depth
Click to see the code ouput
In this example, the numbering and depth are adjusted using the \setcounter commands in the preamble. Only sections and subsections are now numbered, and they are included in the table of contents. The \subsubsection is not numbered or included in the table of contents.
7. Using Paragraphs and Line Breaks
The use of proper paragraph and line breaks is critical in creating a clear and visually appealing document structure. LaTeX provides a number of tools to help with this.
1. Paragraphs:
- Automatic paragraph breaks:
- LaTeX automatically starts a new paragraph when you leave an empty line between lines of text.
- This is the most common and recommended way to create paragraphs.
- Forced paragraph breaks:
- Use the
\parcommand to force a paragraph break even if no empty line follows. - Useful for controlling paragraph placement within environments or for specific formatting needs.
- Use the
2. Line Breaks:
- Hard line breaks:
- Use the
\\command to force a line break within a paragraph. - The line will not stretch to fill the full line width.
- Use the
- Soft line breaks:
- Use the
\newlinecommand to suggest a line break. - LaTeX will decide whether to break the line based on available space and hyphenation rules.
- Use the
- Break with stretching:
- Use the
\linebreakcommand to force a line break and stretch the remaining text to fill the line. - Use with caution as it can affect the readability of your text.
- Use the
3. Formatting considerations:
- Paragraph indentation:
- LaTeX automatically indents the first line of each paragraph by a default amount.
- You can adjust the indentation using the
\setlength{\parindent}{<length>}command.
- Line spacing:
- LaTeX defines the spacing between lines in your document.
- You can change the line spacing globally using packages like
setspaceorparskip.
The following example shows clear demonstration of the commands '\par', '\\', '\newline', '\linebreak', and '\noindent'.
Click to see the code ouput
8. Aligning Text (Left, Center, Right)
Text alignment is essential for creating visually appealing and readable documents. LaTeX provides several methods for aligning text within paragraphs and sections to the left, center, or right.
Here are the two main methods for aligning text in LaTeX:
1. Environment commands:
\begin{flushleft}…\end{flushleft}: Aligns all text within the environment to the left margin.\begin{center}…\end{center}: Centers all text within the environment.\begin{flushright}…\end{flushright}: Aligns all text within the environment to the right margin.
Consider the following example:
Click to see the code ouput
2. Text-mode commands:
\hspace*{<length>}: Inserts horizontal space before the next character, useful for shifting text right.\hspace*{-<length>}: Inserts horizontal space after the current character, useful for shifting text left.\hphantom{<text>}: Inserts a space the same width as the provided text without actually displaying the text.
Consider the following example:
Click to see the code ouput
C. Display Material
In this section, we will look at how to provide display material in LaTeX, such as lists and verbatim text. Display material improves the appearance and organization of your documents.
1. Lists
LaTeX supports three main types of lists: itemize, enumerate, and description.
a. Itemize
The itemize environment is used for creating bulleted lists:
b. Enumerate
The enumerate environment is used for creating numbered lists:
c. Description
The description environment is used for creating lists with descriptions:
Consider the following example:
Click to see the code ouput
2. Verbatim Text
The verbatim environment is used for displaying text exactly as it is typed, without any formatting:
Consider the following example:
Click to see the code ouput
3. Customizing Lists
You can customize the appearance of lists using various commands, such as changing the bullet style or numbering format:
Consider the following example:
Click to see the code ouput
4. Spacing in LaTeX
LaTeX provides several commands for controlling horizontal and vertical spacing within your document. These commands are useful for modifying the layout and appearance of your content.
Horizontal Spaces:
- a.
\hspace{<length>}: This command inserts a horizontal space of the specified length. - b.
\hfill: The\hfillcommand inserts a stretchable space that fills the available horizontal space.
Vertical Spaces:
- a.
\vspace{<length>}: Similar to\hspace,\vspaceadds a vertical space of the specified length. - b.
\vfill:\vfillinserts a stretchable space that fills the available vertical space. - c.
\smallskip,\medskip,\bigskip: These commands provide predefined vertical spaces for small, medium, and large skips, respectively.
Consider the following example which demonstrates all these spacing commands:
Click to see the code ouput
Typography in LaTeX
Typography is important in document presentation because it influences readability and visual appeal. LaTeX includes powerful facilities for manipulating type style, allowing you to change the font, size, and emphasis of your writings.
A. Changing Type Style
You can adjust the type style in LaTeX according to your preferences. Let’s look at some basic commands for changing the type style.
1. Font Family
LaTeX supports various font families, such as serif, sans-serif, and typewriter. You can change the font family using commands like \rmfamily, \sffamily, and \ttfamily, respectively.
2. Font Size
Adjusting the font size is essential for emphasizing specific content. LaTeX provides commands like \tiny, \scriptsize, \footnotesize, \small, \large, \Large,\LARGE, \huge and \Huge to change the font size.
Consider the following example:
Click to see the code ouput
3. Font Series
The font series refers to the thickness or weight of the font. You can use \mdseries (or \textmd) for medium (normal) and \bfseries (or \textbf) for bold.
Click to see the code ouput
4. Font Shape
Font shape refers to the slant or italicization of the text. Use \textup for upright, \textit for italic, \textsl for slanted and \textsc for small caps. Consider the following example.
Click to see the code ouput
5. Emphasizing Text
The \emph{} command is used to emphasize text. The actual styling depends on the context. In an italicized context, it switches to upright, and vice versa. Consider the following example:
Click to see the code ouput
6. Text Color
To add color to your text, you can use the xcolor package and the \textcolor{color}{text} command.
Click to see the code ouput
Customizing the type style in LaTeX gives you complete control over the look of your document. Experiment with these commands to achieve the desired look for different sections of your content.
B. Producing Mathematical Symbols and Formulae
LaTeX excels at mathematical content representation, allowing you to seamlessly integrate mathematical symbols and expressions into your documents. Let’s take a look at the fundamentals of mathematical typesetting in LaTeX.
1. Inline Mathematics
For inline mathematics—mathematics that is part of the text—you can write the mathematical expression using either the dollar sign $...$ or the \(...\) syntax. Both methods are used to include mathematical expressions within the text of your document. For example:
This renders as: “The Pythagorean theorem is \( a^2+b^2=c^2\) and the equation of a circle is \(x^2 + y^2 = r^2\).
2. Displayed Mathematics
For displayed mathematics—mathematics that is centered on its line—you can use \[ and \] or the equation environment. For example:
The output of the above code is :

3. Mathematical Symbols
LaTeX provides a wide range of mathematical symbols. Here are some examples with their corresponding LaTeX command:
Greek Letters
\( \alpha \) (\alpha)
\( \beta \) (\beta)
\( \gamma \) (\gamma)
\( \delta \) (\delta)
\( \epsilon \) (\epsilon)
\( \zeta \) (\zeta)
\( \eta \) (\eta)
\( \theta \) (\theta)
\( \iota \) (\iota)
\( \kappa \) (\kappa)
\( \lambda \) (\lambda)
\( \mu \) (\mu)
\( \nu \) (\nu)
\( \xi \) (\xi)
\( \omicron \) (\omicron)
\( \pi \) (\pi)
\( \rho \) (\rho)
\( \sigma \) (\sigma)
\( \tau \) (\tau)
\( \upsilon \) (\upsilon)
\( \phi \) (\phi)
\( \chi \) (\chi)
\( \psi \) (\psi)
\( \omega \) (\omega)
\( \Gamma \) (\Gamma)
\( \Delta \) (\Delta)
\( \Theta \) (\Theta)
\( \Lambda \) (\Lambda)
\( \Xi \) (\Xi)
\( \Pi \) (\Pi)
\( \Sigma \) (\Sigma)
\( \Upsilon \) (\Upsilon)
\( \Phi \) (\Phi)
\( \Psi \) (\Psi)
\( \Omega \) (\Omega)
Mathematical Functions
\( \sin \) (\sin)
\( \cos \) (\cos)
\( \tan \) (\tan)
\( \cot \) (\cot)
\( \sec \) (\sec)
\( \csc \) (\csc)
\( \arcsin \) (\arcsin)
\( \arccos \) (\arccos)
\( \arctan \) (\arctan)
\( \sinh \) (\sinh)
\( \cosh \) (\cosh)
\( \tanh \) (\tanh)
\( \coth \) (\coth)
\( \ln \) (\ln)
\( \log \) (\log)
\( \liminf \) (\liminf)
\( \limsup \) (\limsup)
\( \max \) (\max)
\( \min \) (\min)
\( |x| \) (|x|)
\( \lceil x \rceil \) (\lceil x \rceil)
\( \lfloor x \rfloor \) (\lfloor x \rfloor)
\( \lim \) (\lim)
Binary operation, Relation and Set therory symbols
\( + \) (+)
\( – \) (-)
\( \times \) (\times)
\( \div \) (\div)
\( \cdot \) (\cdot)
\( \oplus \) (\oplus)
\( \otimes \) (\otimes)
\( \circ \) (\circ)
\( \pm \) (\pm)
\( = \) (=)
\( \neq \) (\neq)
\( < \) (<)
\( > \) (>)
\( \leq \) (\leq)
\( \geq \) (\geq)
\( \equiv \) (\equiv)
\( \approx \) (\approx)
\( \neg \) (\neg)
\( \land \) (\land)
\( \lor \) (\lor)
\( \rightarrow \) (\rightarrow)
\( \leftrightarrow \) (\leftrightarrow)
\( \exists \) (\exists)
\( \forall \) (\forall)
\( \vdash \) (\vdash)
\( \models \) (\models)
\( \emptyset \) (\emptyset)
\( \in \) (\in)
\( \notin \) (\notin)
\( \subset \) (\subset)
\( \subseteq \) (\subseteq)
\( \supset \) (\supset)
\( \supseteq \) (\supseteq)
\( \cup \) (\cup)
\( \cap \) (\cap)
\( \setminus \) (\setminus)
∴ (\therefore)
∵ (\because)
Arrows
\( \leftarrow \) (\leftarrow)
\( \rightarrow \) (\rightarrow)
\( \leftrightarrow \) (\leftrightarrow)
\( \Leftarrow \) (\Leftarrow)
\( \Rightarrow \) (\Rightarrow)
\( \Leftrightarrow \) (\Leftrightarrow)
\( \uparrow \) (\uparrow)
\( \downarrow \) (\downarrow)
\( \updownarrow \) (\updownarrow)
\( \Uparrow \) (\Uparrow)
\( \Downarrow \) (\Downarrow)
\( \Updownarrow \) (\Updownarrow)
\( \nearrow \) (\nearrow)
\( \searrow \) (\searrow)
\( \nwarrow \) (\nwarrow)
\( \swarrow \) (\swarrow)
\( \mapsto \) (\mapsto)
\( \longleftarrow \) (\longleftarrow)
\( \longrightarrow \) (\longrightarrow)
\( \longleftrightarrow \) (\longleftrightarrow)
\( \Longleftarrow \) (\Longleftarrow)
\( \Longrightarrow \) (\Longrightarrow)
\( \Longleftrightarrow \) (\Longleftrightarrow)
\( \rightharpoonup \) (\rightharpoonup)
\( \rightharpoondown \) (\rightharpoondown)
\( \leftharpoonup \) (\leftharpoonup)
\( \leftharpoondown \) (\leftharpoondown)
\( \rightleftharpoons \) (\rightleftharpoons)
Math Accents
\( \overline{a} \) (\overline{a})
\( \underline{a} \) (\underline{a})
\( \bar{a} \) (\bar{a})
\( \widehat{a} \) (\widehat{a})
\( \widetilde{a} \) (\widetilde{a})
\( \vec{a} \) (\vec{a})
\( \dot{a} \) (\dot{a})
\( \ddot{a} \) (\ddot{a})
\( \overrightarrow{AB} \) (\overrightarrow{AB})
\( \overleftarrow{AB} \) (\overleftarrow{AB})
\( \overleftrightarrow{AB} \) (\overleftrightarrow{AB})
Miscellaneous symbols
\( \infty \) (\infty)
\( \Re \) (\Re)
\( \Im \) (\Im)
\( \nabla \) (\nabla)
\( \partial \) (\partial)
\( \neg \) (\neg)
\( \triangle \) (\triangle)
\( \cdots \) (\cdots)
\( \vdots \) (\vdots)
\( \ldots \) (\ldots)
\( \ddots \) (\ddots)
\( \angle \) (\angle)
\( \bigcup \) (\bigcup)
\( \bigcap \) (\bigcap)
\( \cong \) (\cong)
Superscript: ‘x^2’ produces \( x^2\) and ‘B^{a^{b}}’ produces \(B^{a^{b}}\)
Subscript: ‘y_1’ produces \( y_1 \) and ‘A_{i_{j}}’ produces \(A_{i_{j}}\)
Fractions: ‘\frac{a}{b}’ produces \( \frac{a}{b} \)
Square root: ‘\sqrt{3}’ produces \( \sqrt{3}\)
\(n^{\text{th}}\) root: ‘\sqrt[n]{3}’ produces \( \sqrt[n]{3} \)
Integral: ‘\int ‘ produces \( \int \), ‘\iint’ produces \( \iint \), ‘\oint’ produces \(\oint \) and ‘\int_a^b’ produces \( \int_a^b \)
Summation: ‘\sum’ produces \( \sum \) and ‘\sum_{n=0}^{\infty}’ produces \( \sum_{n=0}^{\infty} \)
4. Mathmatical Packages
Mathematical packages in LaTeX extend the functionality, symbols, and formatting options available for mathematical typesetting. While LaTeX includes math features by default, these packages expand its capabilities, making it even more powerful for expressing mathematical content. Here are some examples of commonly used mathematical packages.
1. ‘amsmath’ Package:
The 'amsmath' package is essential for advanced mathematical typesetting. It introduces numerous environments like align, align*, and more.
2. ‘amssymb’ Package:
The 'amssymb' package provides additional mathematical symbols, such as \( \mathbb{R}\) for the set of real numbers.
3. ‘calrsfs’ Package:
The 'calrsfs' package is a LaTeX package that provides a calligraphic font alternative for mathematical symbols. It is an abbreviation for “Calligraphic Raph Smith” and is intended to provide a distinct and aesthetically pleasing calligraphic script.
5. Mathematical Fonts (Math Mode)
LaTeX includes a number of mathematical fonts for various purposes, allowing you to express mathematical symbols and structures in a variety of styles. Here are some examples of commonly used mathematical fonts.
1. Double-Struck (Blackboard Bold) Letters:
The \mathbb{} command in LaTeX is used to produce double-struck letters, often referred to as Blackboard Bold. This is commonly used for denoting sets such as real numbers, integers, complex numbers, etc.
2. Calligraphic (Script) Letters:
The \mathcal{} command is used to produce calligraphic or script-like letters. It is often used for denoting special sets or script letters in mathematical notation.
3. Fraktur (Gothic) Letters:
The \mathfrak{} command is used to produce Fraktur or Gothic letters. Fraktur is a specific type of blackletter typeface that is often associated with mathematical symbols.
Consider the following example:
The output of the above code is shown below:

6. Spacing in Math Mode
In LaTeX, math mode spacing is critical for proper alignment and presentation of mathematical expressions. There are several commands available to control the spacing between mathematical elements. Consider the following example in which the commands ‘ \, ‘, ‘ \: ‘, ‘ \; ‘, ‘ \quad ‘ and ‘ \qquad ‘ are used.
Output

C. Mathematical Enviornments
LaTeX includes multiple mathematical environments for typesetting various mathematical content elements, ranging from simple equations to complicated structures such as matrices and alignments.
1. 'equation' Environment:
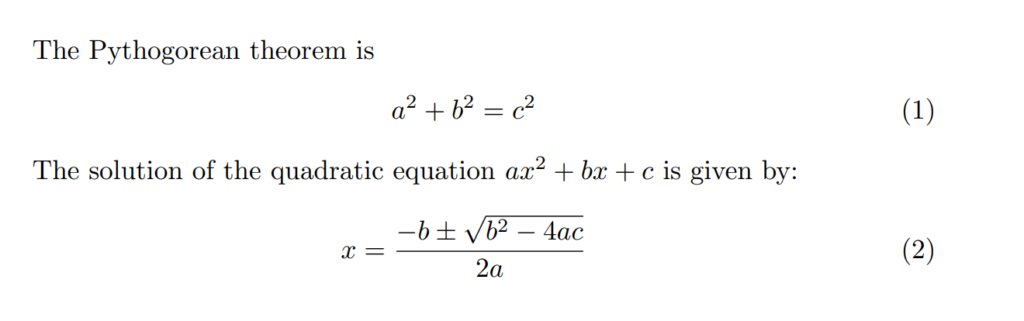
The 'equation' environment is used for displaying a single, centered equation with an equation number. It’s often used for important equations that you might want to refer to later. Consider the example:
The output of the above code is shown below:
2. 'align' Environment:
The 'align' environment is used to align multiple equations at specific points on the screen. It’s a useful tool for aligning equations, especially when you have multiple equations with common alignment points. Consider the following example:
The output of the above code is shown below:
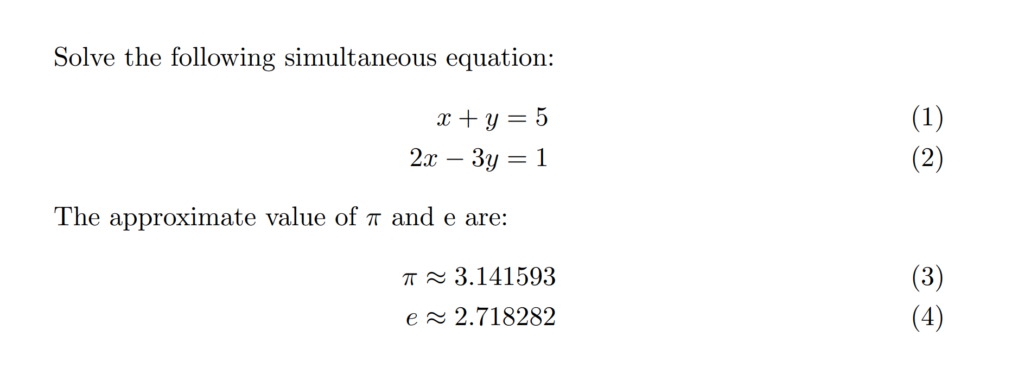
The '&' symbol in the 'align' environment in LaTeX is used as an alignment marker. It specifies the point at which the equations will be aligned.
3. ' align* ' Environment
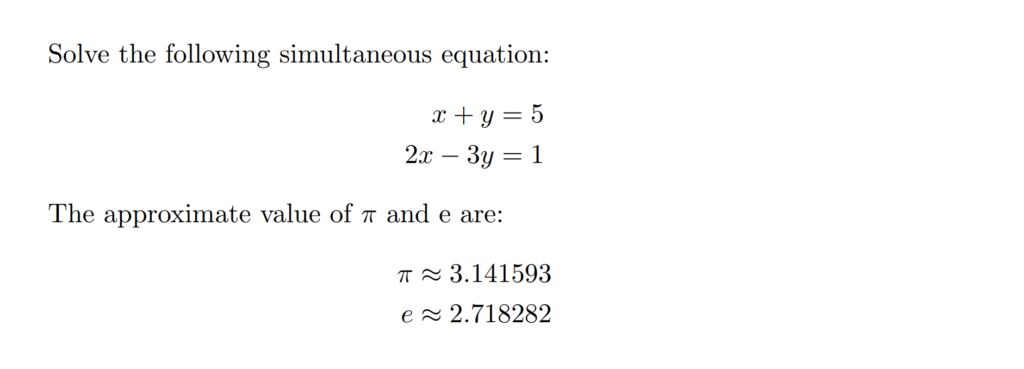
In LaTeX, the 'align*'environment is a variant of the align environment. It is used to align multiple equations without assigning equation numbers to the equations. Consider the previous example but with 'align*'environment :
The output of the above code is shown below:
4. 'cases' Environment:
The 'cases' environment is used to define piecewise functions. It provides a convenient way to express functions with different definitions for different ranges of the variable. Consider the following example:
The output of the above code is shown below:

5. Matrix Environment:
LaTeX includes several matrix environments for typesetting matrices and other similar structures. For various matrix types, these environments provide a variety of styles and formatting options. Each matrix environment is used in math mode and typically within an equation environment (‘\[ ... \]‘, '$ ... $'or \begin{equation} ... \end{equation}). Elements in the matrix are separated by ‘&', and each row ends with ‘\\'.
Let’s look at some examples of matrix environments:
The 'matrix' environment is the basic matrix environment in LaTeX. It creates a matrix without any delimiters. The syntax is as follows:
The output of the above code is shown below:

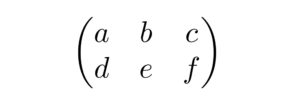
The 'pmatrix' environment creates a matrix with parentheses as delimiters. The syntax is as follows:
The output of the above code is shown below:
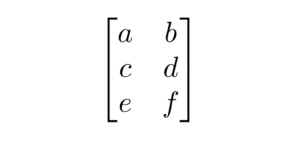
The bmatrix environment creates a matrix with square brackets as delimiters. The syntax is as follows:
The output of the above code is shown below:
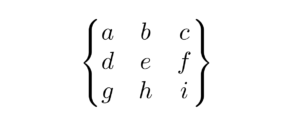
The Bmatrix environment creates a matrix with curly braces as delimiters. The syntax is as follows:
The output of the above code is shown below:
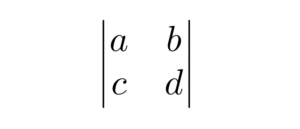
The vmatrix environment creates a matrix with single vertical bars as delimiters. The syntax is as follows:
The output of the above code is shown below:
The Vmatrix environment creates a matrix with double vertical bars as delimiters. The syntax is as follows:
The output of the above code is shown below:

6. 'theorem-like' Environment:
In mathematical typesetting, presenting theorems, definitions, lemmas, corollaries, and notes in a structured and methodical manner is crucial for efficient communication of mathematical concepts. The amsthm package in LaTeX provides a comprehensive range of tools for creating theorem-like settings that contribute to the clarity and structure of mathematical content. The following definitions introduce five separate environments: 'theorem', 'lemma', 'definition', 'corollary', and 'remark'.
Theorem Environment:
The 'theorem' environment is excellent for presenting important mathematical propositions. It is section-numbered, ensuring a structured enumeration that starts over in each section.
Lemma Environment:
The 'lemma'environment is used to state supporting results or lemmas that help to understand and prove overarching theorems. For an ordered enumeration, it shares numbering with the theorem context.
Definition Environment:
The 'definition' environment is intended for introducing and defining mathematical concepts. Similar to lemmas, definitions share numbering with the underlying 'theorem' environment, promoting a unified enumeration of mathematical entities.
Corollary Environment:
The 'corollary' environment conveys immediate consequences or results derived from established theorems in a concise manner. Sharing numbering with the 'theorem' environment ensures a consistent and logical flow of corollary enumeration.
Remark Environment:
The 'remark'environment allows for insightful comments or observations about the presented theorems. Remarks are seamlessly integrated into the mathematical discourse by sharing numbering with the 'theorem' environment.
Consider the following example:
Click to see the code ouput
This example creates a section titled “Mathematical Content” and includes a theorem, its proof, two corollaries, a lemma, a definition, and a remark related to the Pythagorean Theorem.
D. Arrays and Delimiters
Arrays, which are essentially tables of mathematical expressions arranged in rows and columns, are created in LaTeX using the array environment. Delimiters, on the other hand, are symbols that are used to surround or enclose mathematical expressions and adjust their size dynamically to match the enclosed content. Let’s get into the fundamentals of arrays and delimiters in LaTeX.
1. Arrays
You can create arrays in math mode using the array environment. It is similar to the tabular environment used in text mode but is specifically designed for mathematical expressions. The following is the syntax:
'column_specification'defines the alignment of each column (e.g.,lfor left,cfor center,rfor right and | for vertical line).- Entries are placed in rows, separated by
&, and rows end with\\.
In this example:
- The first column is specified as left-aligned (
l). - The second column is specified as right-aligned (
r). - The third column is specified as centered (
c). - Vertical lines (
|) are used to separate columns.
The output of the above code is shown below:

The output of the above code is shown below:

The output of the above code is shown below:

The output of the above code is shown below:

The output of the above code is shown below:

2. Delimiters
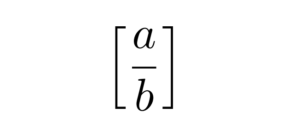
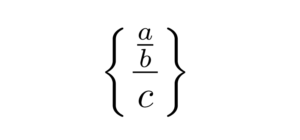
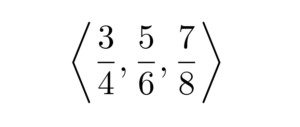
LaTeX includes a number of delimiters that adjust their size based on the enclosed content. Parentheses '()', brackets '[]', braces '{}', and the vertical bar '|'are all common delimiters. You can automatically adjust the size of these delimiters by using the '\left' and '\right' commands. Consider the following examples:
The output of the above code is shown below:
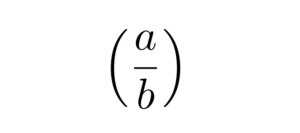
The output of the above code is shown below:
The output of the above code is shown below:
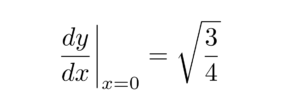
The output of the above code is shown below:
Here '\left.' is an invisible left delimiter, and '\right|' is a right delimiter that represents a vertical bar '|'. The output of the above code is shown below:
Below is the list of Delimiters with their corresponding LaTeX command.
\( ( \) ( ( )
\( ) \) ( ) )
\( [ \) ( [ )
\( ] \) ( ] )
\( \{ \) ( \{ )
\( \} \) ( \} )
\( \| \) ( \| )
\( \langle \) ( \langle )
\( \rangle \) ( \rangle )
\( / \) ( / )
\( \backslash \) ( \backslash )
\( | \) ( | )
\( \lfloor \) ( \lfloor )
\( \rfloor \) ( \rfloor )
\( \lceil \) ( \lceil )
\( \rceil \) ( \rceil )
The first part of our blog covered fundamental aspects of LaTeX for beginners and educators. We introduced the significance of LaTeX, steps to get started, and basics of LaTeX input files. We discussed document formatting, including document class selection, sectioning, and display materials. Typography in LaTeX, covering font styles and mathematical symbols, was also explored. In the second part, we’ll delve into advanced features like custom commands, graphics, figures, columns, tables of contents, and more. Click this link to explore advanced LaTeX features and expand your knowledge.
Nice work..
Most Informative and useful…
Thank you Dr.Anantha Gade Sir
It is very helpful to understand all
Pingback: LaTeX Unlocked - mathonlinenotes.com
Very useful